
Upskill yourself for this job market
Fighting fire with fire in this weird job market.

Let’s face it. The job market is gloomy this year. There’s a significant transition in the strategies for many large corporates, and it’s headline goal is to do more with less, with an emphasis on leveraging AI instead of hiring for traditional roles.
This can make the application process extremely hard, especially if you’re seeking a new role in this tight market. Recently, a report said that there is currently 1 job opening for every 2 applicants, creating an incredibly tough environment. If you're looking for a job, the best way still is through your network, but if you’re a recent grad or leaving a company you’ve been with for a long time, that can be tough. So while networking is still critical and vital, sometimes good ol’ brute force applying still needs to happen.
Your resume is fine and can be edited here and there depending on the job description. Still, that annoying cover letter can take hours out of your day when you damn well know the recruiter already decided to reach out in the first few seconds of seeing your resume.
So, let’s figure out how to automate the generation of a cover letter without paying nearly as much for ChatGPT Plus and still tuning to the specifics of the company job description. You can ignore all of this by copying and pasting your resume & job description in ChatGPT Plus, but this tutorial allows you to customize it a bit more & for less $ while teaching you the fundamentals of OpenAI’s API - an in-demand skill in this market that sets you apart.
We are going to create a simple bot on Google Colab to take in the job description, title, and your resume and spit out a cover letter ready to tune & send in just a few minutes. First, for those of you who just want to use it and not go through the tutorial, you can jump to: Code Here
But we are going to start with some of the more technical aspects to learn how to create one of your own.
Step 1: Set Up
First, ensure that you have an OpenAI account. You’ll need a payment method, but don’t worry, this will cost less than a cent per query, and you can place spend caps to ensure you don’t go over!
Learn how to set up an OpenAI account here.
Step 2: Open a new Google Colab Notebook.
Open a new notebook here, and create a code block to get started.
For each block, create a new block. This helps us debug and test various blocks a bit easier.
Block 1 and 2: Installing Packages

First, we are going to install and set up the needed packages. I separated this into 2 different blocks because we only need to install these packages once per Runtime, and we can comment out the 2 top lines by putting a “#” in front of each line once we run it once.
Block 1:
#Install the neccessary packages

!pip install openai
!pip install PyPDF2
Block 2:
from openai import OpenAI
from PyPDF2 import PdfReader
Block 3: Inserting API Key

The next block we need to insert our API key. Head over to your OpenAI account and on the left menu, select “API keys” and hit “Create a new secret key”. You will be shown a length of characters that you MUST copy right then and there, as you won’t be able to view it later. Copy and paste that string of characters between the quotation marks. Keep this key as secret as possible, as it’s a way for people to use & charge your account. You can always generate a new key and delete your old one(s) if you forget them or think they have been compromised.
Block 3:
OPENAI_API_KEY = "ENTER OPEN API KEY HERE"
client = OpenAI(api_key=OPENAI_API_KEY)
Block 4: Prompt Info Gathering.
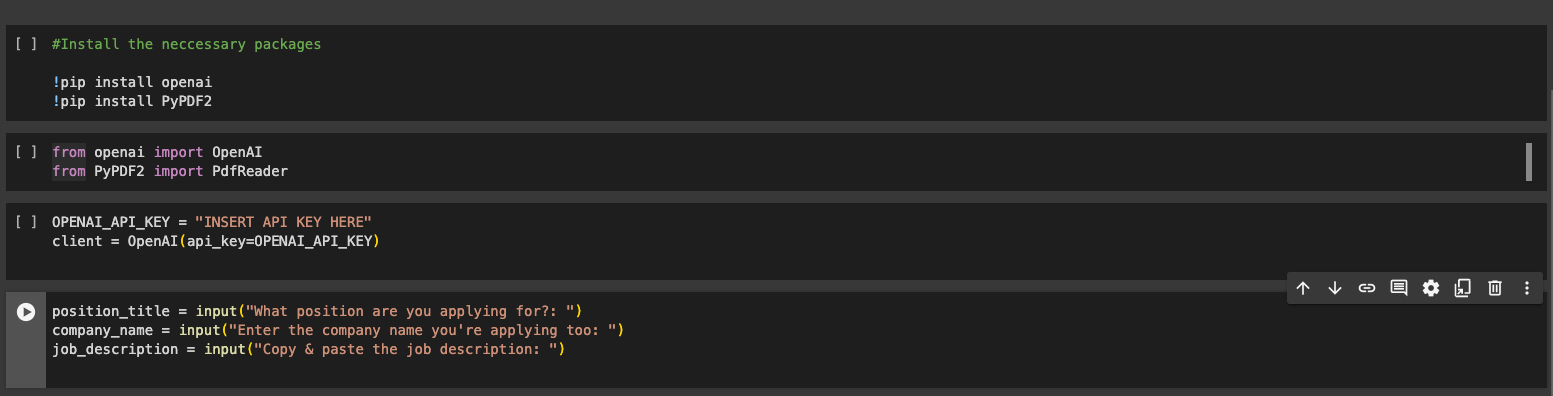
This next block is used when we run the program to feed information specific to this cover letter to GPT-3.5 to help generate a custom cover letter. There is no need to edit the code between the quotes—these will pop up as input boxes when we run the program, so we can change the answers.
Block 4:
position_title = input("What position are you applying for?: ")
company_name = input("Enter the company name you're applying too: ")
job_description = input("Copy & paste the job description: ")
Block 5&6

In this final block, we are going to create the bulk of our code and execute the actual prompt and call OpenAI. The large section in quotes is our prompt, so feel free to edit it however you see fit. The white parts in the brackets will pull the responses that we input when we run Block 4.
Block 5:
def main():
  resume = 'resume.pdf'
  if resume is not None:
          pdf_reader = PdfReader(resume)
          text=''
          for page in pdf_reader.pages:
              text += page.extract_text()


  completion = client.chat.completions.create(
      model="gpt-3.5-turbo-0125",
      messages=[
      {"role": "system", "content": f"""
      Return a professional cover letter for a {position_title} position at {company_name}. Here is the job description {job_description} & here is the resume:
      {text} only repond with the contents of the cover letter, and ensure the content is approximetly 1 page, excluding the title and information at the top."""},
      ]
  )

  print(completion.choices[0].message.content)
Block 6:
if __name__ == '__main__':
    main()
That’s it! Just six simple blocks of code, and we are ready to generate some cover letters.
Step 3: Running the code
Let’s try it out!
Upload your resume
Using an example resume, I’m going to drag and drop it in the left “files” portion, and ensure it’s named “resume.pdf” as that is how we are telling the program how to find it in Block 5.

Run the program!
On the menu bar, hover over the “Runtime” section, and select “Run all”.

Insert responses.
A few seconds in to your code running, you will be prompted in Block 4 to fill out the questions we outlined. Copy & paste or type the answers and hit enter to proceed. Try to copy as much of the posted job description as possible, including the “about the company” portion. You do not need to include the disclaimers at the bottom.

Get your cover letter!
When the program is done, you should see cover letter text at the bottom. Copy & paste it into a document and give it some edits!


Note: Due to Google Colab being free, after a while of inactivity your Runtime will automatically disconnect, and you will need to reupload your resume.pdf file.
That’s it! Re-run the program for each new cover letter and fill in the prompts. In a tough job market, sometimes you just need to mass apply, and here’s a cheap and easy tool to make that happen. (Also, now you can add Python & OpenAI APIs to your resume 😉 )
If you read the whole thing and tried it out, let me know how it went! If there are any errors, please reply to this email, and I’ll help sort them out!
If you enjoyed this and it was helpful, consider subscribing. I started Prompter to help the workforce transition to an automated future, while upskilling people with small and simple AI & automation projects to help boost productivity at work. Our letter is never overly technical, and always immediately helpful.
See you soon!
— Nishad from Prompter
function ClickConnect() {
console.log('Clicked')
document
.querySelector('#top-toolbar > colab-connect-button')
.shadowRoot.querySelector('#connect')
.click()
}
setInterval(ClickConnect, 60000)//milliseconds
(Here is the Code Nishad, paste it into your Google colab) You can modify it to suit your preference.
Nice read. There's a script to ensure that Google colab does not shut after some time. Will share it so that anyone who wants to go an extra mile will incorporate in their resume project.